Discovery Server
The TurtleBot 4 can be configured for either Simple Discovery or Discovery Server, not both. A mixture of settings will result in a system that does not work properly.
See Networking for details.
Robot Setup
- Warning
ROS 2 Galactic is no longer supported. Please consider upgrading to a newer release
WarningThe Turtlebot 4 discovery server Galactic implementation does not support more than one robot in the system. Please upgrade to Humble.
Create® 3
The Create® 3 needs to be updated to the latest firmware, have its Wi-Fi disabled, and be configured to use the Raspberry Pi as the discovery server over the USB-C connection.
Setup instructions:
- Update to the latest firmware using the webserver.
- Once updated, perform a factory reset to disconnect the Create® 3 from any Wi-Fi networks.
- On the webserver, go to Application -> Configuration. Save the following settings:
Create® 3 discovery server settings Raspberry Pi
The Raspberry Pi needs to enable IP forwarding, configure itself as the discovery server, and reinstall the TurtleBot 4 upstart job with the new configuration. Environment variables will now be declared in
/etc/turtlebot4_discovery/setup.bash, such that both the terminal and upstart environment will have the same configurations.Setup instructions:
- SSH into the Raspberry Pi
- Uncomment "net.ipv4.ip_forward=1" in
/etc/sysctl.conf - Get and install discovery files:
git clone https://github.com/turtlebot/turtlebot4_setup.git -b galactic && \ sudo mv turtlebot4_setup/turtlebot4_discovery /etc/ && \ sudo mv turtlebot4_setup/scripts/install.py /usr/local/bin/ && \ rm turtlebot4_setup -rf - Source other workspaces in
/etc/turtlebot4_discovery/setup.bashif needed - Add the following line to .bashrc:
source /etc/turtlebot4_discovery/setup.bash - Re-install the upstart job with the updated
install.pyscript:
install.py --discovery on --workspace /etc/turtlebot4_discovery/setup.bashWhen the Create® 3 chimes, restart the robot by powering it off with the power button and placing it back on the dock.
TipYou can move any ROS2 related environment variables such as
ROS_DOMAIN_IDfrom~/.bashrcto/etc/turtlebot4_discovery/setup.bash -
Create® 3
The Create® 3 needs to be updated to the latest firmware and have its Wi-Fi disabled.
Setup instructions:
- Update to the latest firmware using the webserver.
- Once updated, perform a factory reset to disconnect the Create® 3 from any Wi-Fi networks.
NoteEnsure that this factory reset is done before the remaining setup as it will clear out the settings that are written to the Create® 3 by the Raspberry Pi.
Raspberry Pi
The Raspberry Pi needs to be configured to host a discovery server, and the TurtleBot 4 upstart job needs to be reinstalled with the new configuration. During this step, the Raspberry Pi will also write the discovery server details to the Create® 3 and enable the
create3_republisherthat will make all of the Create® 3 topics conveniently broadcast by the Raspberry Pi. For more information on thecreate3_republishersee the Create® 3 Republisher section of the Create® 3 page.Setup instructions:
- SSH into the Raspberry Pi
- Run the TurtleBot 4 setup tool:
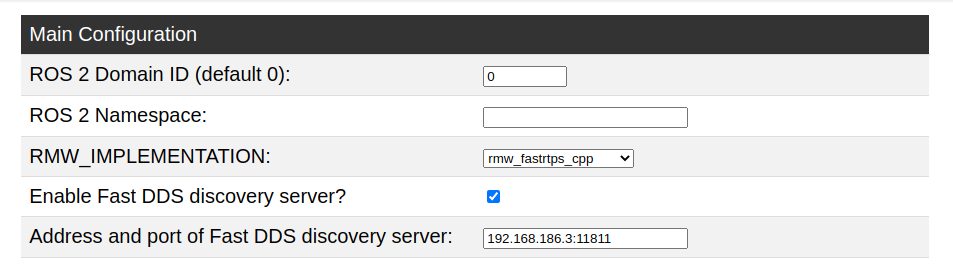
turtlebot4-setup- Enter the Discovery Server menu via ROS Setup.
- Set Enabled to
True. - Onboard Discovery Server: This is the primary server that will connect the onboard robot nodes.
- Leave onboard server port as
11811. - Set the onboard server ID as a unique number in the system. If there is only one robot then this can be left as
0. If there is more than one robot then give each robot a unique number between 0 and 255.
- Leave onboard server port as
- Offboard Server: This allows support for the robots to communicate on an offboard server but is not recommended for beginners because it can overload the network when there are too many robots.
- Leave all of these as default. When the offboard IP address is blank then all offboard server settings will be ignored.
- Save the settings, navigate to the main menu, and apply settings.
- Exit the setup tool
- In your terminal, call
turtlebot4-sourceto apply the new settings to your terminal. - Restart the ROS 2 daemon with
turtlebot4-daemon-restartorros2 daemon stop; ros2 daemon start - When the Create® 3 chimes, call
ros2 topic listto view topics
TipWhen a network change occurs or a robot ROS service or robot is rebooted, you may need to restart the ros2 daemon to see the changes with the ROS 2 command line tools (ros2cli).
You may also need to call
ros2 topic listtwice to get a full list of topics. This is because the first time that you run the command, it starts the daemon which will record all of the available topics. If there are a lot of ROS nodes then it may take some time before the full topic list is available. -
Create® 3
The Create® 3 needs to be updated to the latest firmware and have its Wi-Fi disabled.
Setup instructions:
- Update to the latest firmware using the webserver.
- Once updated, perform a factory reset to disconnect the Create® 3 from any Wi-Fi networks.
NoteEnsure that this factory reset is done before the remaining setup as it will clear out the settings that are written to the Create® 3 by the Raspberry Pi.
Raspberry Pi
The Raspberry Pi needs to be configured to host a discovery server, and the TurtleBot 4 upstart job needs to be reinstalled with the new configuration. During this step, the Raspberry Pi will also write the discovery server details to the Create® 3.
Unlike ROS 2 Humble, the Jazzy version always uses the
create3_republishernode to broadcast the Create® 3 topics, services, and actions from the Raspberry Pi. For more information on thecreate3_republishersee the Create® 3 Republisher section of the Create® 3 page.Setup instructions:
- SSH into the Raspberry Pi
- Run the TurtleBot 4 setup tool:
turtlebot4-setup- Enter the Discovery Server menu via ROS Setup.
- Set Enabled to
True. - Onboard Discovery Server: This is the primary server that will connect the onboard robot nodes.
- Leave onboard server port as
11811. - Set the onboard server ID as a unique number in the system. If there is only one robot then this can be left as
0. If there is more than one robot then give each robot a unique number between 0 and 255.
- Leave onboard server port as
- Offboard Server: This allows support for the robots to communicate on an offboard server but is not recommended for beginners because it can overload the network when there are too many robots.
- Leave all of these as default. When the offboard IP address is blank then all offboard server settings will be ignored.
- Save the settings, navigate to the main menu, and apply settings.
- Exit the setup tool
- In your terminal, call
turtlebot4-sourceto apply the new settings to your terminal. - Restart the ROS 2 daemon with
turtlebot4-daemon-restartorros2 daemon stop; ros2 daemon start - When the Create® 3 chimes, call
ros2 topic listto view topics
TipWhen a network change occurs or a robot ROS service or robot is rebooted, you may need to restart the ros2 daemon to see the changes with the ROS 2 command line tools (ros2cli).
You may also need to call
ros2 topic listtwice to get a full list of topics. This is because the first time that you run the command, it starts the daemon which will record all of the available topics. If there are a lot of ROS nodes then it may take some time before the full topic list is available.
User PC Setup
- Warning
ROS 2 Galactic is no longer supported. Please consider upgrading to a newer release
Because the Create® 3 is not on the same network as the user PC, an IP route has to be added on the user PC to reach the Create® 3, through the Raspberry Pi. This route must be up at all times to maintain a connection between the PC and the Create® 3. Additionally, every device in the system must use
rmw_fastrtps_cppas their DDS and must define theROS_DISCOVERY_SERVERenvironment variable to inform FastDDS of the IP and port of the server.Each remote PC that will be communicating with the TurtleBot 4 will have to add an IP route for the Create® 3, as well as configure the ROS 2 environment to use the RPi4 as the discovery server. The IP route will be added using a service so that it persists through reboots.
Get and install discovery files:
git clone https://github.com/turtlebot/turtlebot4_setup.git -b galactic && \
sudo mv turtlebot4_setup/ip_route/ip_route.service /etc/systemd/system/ && \
sudo mv turtlebot4_setup/ip_route/ip_route.sh /usr/local/sbin/ && \
sudo mkdir /etc/turtlebot4_discovery/ && \
sudo mv turtlebot4_setup/turtlebot4_discovery/discovery_super_client.xml /etc/turtlebot4_discovery/ && \
sudo mv turtlebot4_setup/turtlebot4_discovery/setup.bash /etc/turtlebot4_discovery/ && \
rm turtlebot4_setup -rf
Get the RPi4 Wi-Fi IP address and replace the following values with it:
- In
/usr/local/sbin/ip_route.sh, replace10.42.0.1 - In
/etc/turtlebot4_discovery/discovery_super_client.xml, replace127.0.0.1 - In
/etc/turtlebot4_discovery/setup.bash, replace127.0.0.1
Start the ip route service:
sudo systemctl daemon-reload
sudo systemctl enable ip_route.service
sudo systemctl start ip_route.service
Add this line to .bashrc:
source /etc/turtlebot4_discovery/setup.bashSource .bashrc to apply settings:
source ~/.bashrcThen, run:
ros2 daemon stop; ros2 daemon startto restart the ROS 2 daemon.
You should now be able to see the Raspberry Pi and Create® 3 topics:
ros2 topic listNoteWhen a network change occurs or a robot ROS service or robot is rebooted, you may need to restart the ros2 daemon to see the changes with the ROS 2 command line tools (ros2cli).
You may also need to call
ros2 topic listtwice to get a full list of topics. This is because the first time that you run the command, it starts the daemon which will record all of the available topics. If there are a lot of ROS nodes then it may take some time before the full topic list is available. - In
-
In order to see all of the nodes and topics, any computer, including the user PC has to use
rmw_fastrtps_cppas their DDS and must define theROS_DISCOVERY_SERVERenvironment variable to inform FastDDS of where to contact the discovery servers.NotePreviously the user PC needed routing configured to access the Create® 3 through the Raspberry Pi. This route is no longer necessary/used and can be removed.
A convenient script to configure the user PC exists in the turtlebot4_setup repo.
To download and run the script, call:
wget -qO - https://raw.githubusercontent.com/turtlebot/turtlebot4_setup/humble/turtlebot4_discovery/configure_discovery.sh | bash <(cat) </dev/ttyYou will be prompted for a few settings. All of these settings must match the settings configured on the robots and/or discovery servers in the system:
- The
ROS_DOMAIN_IDof your robot(s) (0 by default) - The Discovery Server Information. For each server it will ask for:
- The Discovery Server ID (0 by default, each server must have a unique server ID)
- The Discovery Server IP address (most often should be the TurtleBot4 Raspberry Pi WiFi IP)
- The Discovery Server port (11811 by default)
- If you only have one server then you can select done
d, if you entered any of the information incorrectly then you can select re-enterror if you need to add another discovery server (for example on a different robot) then you can select add anothera.
Once you have entered these values, the script will perform the following:
- Create a directory called
/etc/turtlebot4_discovery/ - Create a setup.bash file in
/etc/turtlebot4_discovery/with the required configurations. - Add the line
source /etc/turtlebot4_discovery/setup.bashto your~/.bashrcfile. - Check if an IP route already exists from the previous method of discovery server configuration. If it does, it will delete the route.
After the script has run, call:
source ~/.bashrcto apply the new settings.
Then, run:
ros2 daemon stop; ros2 daemon startto restart the ROS 2 daemon.
You should now be able to see the Raspberry Pi and Create® 3 topics:
ros2 topic listNoteWhen a network change occurs or a robot ROS service or robot is rebooted, you may need to restart the ros2 daemon to see the changes with the ROS 2 command line tools (ros2cli).
You may also need to call
ros2 topic listtwice to get a full list of topics. This is because the first time that you run the command, it starts the daemon which will record all of the available topics. If there are a lot of ROS nodes then it may take some time before the full topic list is available. - The
-
In order to see all of the nodes and topics, any computer, including the user PC has to use
rmw_fastrtps_cppas their DDS and must define theROS_DISCOVERY_SERVERenvironment variable to inform FastDDS of where to contact the discovery servers.NotePreviously the user PC needed routing configured to access the Create® 3 through the Raspberry Pi. This route is no longer necessary/used and can be removed.
A convenient script to configure the user PC exists in the turtlebot4_setup repo.
To download and run the script, call:
wget -qO - https://raw.githubusercontent.com/turtlebot/turtlebot4_setup/jazzy/turtlebot4_discovery/configure_discovery.sh | bash <(cat) </dev/ttyYou will be prompted for a few settings. All of these settings must match the settings configured on the robots and/or discovery servers in the system:
- The
ROS_DOMAIN_IDof your robot(s) (0 by default) - The Discovery Server Information. For each server it will ask for:
- The Discovery Server ID (0 by default, each server must have a unique server ID)
- The Discovery Server IP address (most often should be the TurtleBot4 Raspberry Pi WiFi IP)
- The Discovery Server port (11811 by default)
- If you only have one server then you can select done
d, if you entered any of the information incorrectly then you can select re-enterror if you need to add another discovery server (for example on a different robot) then you can select add anothera.
Once you have entered these values, the script will perform the following:
- Create a directory called
/etc/turtlebot4_discovery/ - Create a setup.bash file in
/etc/turtlebot4_discovery/with the required configurations. - Add the line
source /etc/turtlebot4_discovery/setup.bashto your~/.bashrcfile. - Check if an IP route already exists from the previous method of discovery server configuration. If it does, it will delete the route.
After the script has run, call:
source ~/.bashrcto apply the new settings.
Then, run:
ros2 daemon stop; ros2 daemon startto restart the ROS 2 daemon.
You should now be able to see the Raspberry Pi and Create® 3 topics:
ros2 topic listNoteWhen a network change occurs or a robot ROS service or robot is rebooted, you may need to restart the ros2 daemon to see the changes with the ROS 2 command line tools (ros2cli).
You may also need to call
ros2 topic listtwice to get a full list of topics. This is because the first time that you run the command, it starts the daemon which will record all of the available topics. If there are a lot of ROS nodes then it may take some time before the full topic list is available. - The
Example Configuration
2 Robots and 1 User Computer
Recommended Architecture
- Warning
ROS 2 Galactic is no longer supported. Please consider upgrading to a newer release
There is currently no example for Galactic.
-
Each robot is always configured with its own discovery server. This allows each robot to operate independently even if the WiFi is disconnected. Since there are two robots and therefore two discovery servers in the system, the discovery servers must be assigned unique server IDs. In this case, the first robot will be assigned server ID 0 and the second robot will be assigned server ID 1. Similarly, the robots need unique namespaces in order for their topics to be distinguished from each other. In this case they will be assigned as
/robot1and/robot2.Although both robots are present in the same system, this example will not include direct inter-robot communication. Each robot's discovery server will be isolated from the other. Instead, the robots will both communicate with the user computer which can be thought of as a command center. This allows for the number of robots to be scaled up while minimizing the load on the network.
The user computer will connect to both discovery servers, allowing the user computer to see all of the ROS nodes / topics from each of the robots. Each of the robots will be able to see all of the ROS nodes / topics from the user computer as well. This allows the user computer to send commands to each of the robots, coordinating the system and sharing information across the fleet as necessary.
Although one could run another discovery server on the user computer, this would add significant load on all of the robots unless done in such a way that the server was isolated from the robot servers. This is not recommended for most use cases.
Example Robot Setup
- Warning
ROS 2 Galactic is no longer supported. Please consider upgrading to a newer release
There is currently no example for Galactic.
-
Robot 1 Robot 2 ROS Setup→Bash SetupROBOT_NAMESPACE [/robot1]ROS Setup→Discovery ServerEnabled [True] Onboard Server - Port [11811] Onboard Server - Server ID [0] Offboard Server - IP [] Offboard Server - Port [11811] Offboard Server - Server ID [1]Wi-Fi SetupWi-Fi Mode [Client] SSID [my_ttb4_network] Password [secure_password] Band [5GHz] IP Address [] DHCP [True]ROS Setup→Bash SetupROBOT_NAMESPACE [/robot2]ROS Setup→Discovery ServerEnabled [True] Onboard Server - Port [11811] Onboard Server - Server ID [1] Offboard Server - IP [] Offboard Server - Port [11811] Offboard Server - Server ID [1]Wi-Fi SetupWi-Fi Mode [Client] SSID [my_ttb4_network] Password [secure_password] Band [5GHz] IP Address [] DHCP [True] -
Robot 1 Robot 2 ROS Setup→Bash SetupROBOT_NAMESPACE [/robot1]ROS Setup→Discovery ServerEnabled [True] Onboard Server - Port [11811] Onboard Server - Server ID [0] Offboard Server - IP [] Offboard Server - Port [11811] Offboard Server - Server ID [1]Wi-Fi SetupWi-Fi Mode [Client] SSID [my_ttb4_network] Password [secure_password] Band [5GHz] IP Address [] DHCP [True]ROS Setup→Bash SetupROBOT_NAMESPACE [/robot2]ROS Setup→Discovery ServerEnabled [True] Onboard Server - Port [11811] Onboard Server - Server ID [1] Offboard Server - IP [] Offboard Server - Port [11811] Offboard Server - Server ID [1]Wi-Fi SetupWi-Fi Mode [Client] SSID [my_ttb4_network] Password [secure_password] Band [5GHz] IP Address [] DHCP [True]
Example User Computer Setup
- Warning
ROS 2 Galactic is no longer supported. Please consider upgrading to a newer release
There is currently no example for Galactic.
-
From the robot configuration the robot server IDs and the ROS Domain ID are known, and from the robots themselves or the router the IP addresses are known. It is recommended that the robot IPs be reserved on the router so that they always remain the same and this process does not need to be repeated. Running the user computer configuration script as described above, would look as follows:
ROS_DOMAIN_ID [0]: 0 Enter the information for the first discovery server Discovery Server ID [0]: 0 Discovery Server IP: 192.168.131.5 Discovery Server Port [11811]: Re-enter the last server (r), add another server (a), or done (d): a Enter the information for the next discovery server Discovery Server ID [0]: 1 Discovery Server IP: 192.168.131.6 Discovery Server Port [11811]: Re-enter the last server (r), add another server (a), or done (d): d Configuring: ROS_DOMAIN_ID=0 ROS_DISCOVERY_SERVER="192.168.131.5:11811;192.168.131.6:11811;" [sudo] password for cpr-1234: Source your ~/.bashrc file to apply changes -
From the robot configuration the robot server IDs and the ROS Domain ID are known, and from the robots themselves or the router the IP addresses are known. It is recommended that the robot IPs be reserved on the router so that they always remain the same and this process does not need to be repeated. Running the user computer configuration script as described above, would look as follows:
ROS_DOMAIN_ID [0]: 0
Enter the information for the first discovery server
Discovery Server ID [0]: 0
Discovery Server IP: 192.168.131.5
Discovery Server Port [11811]:
Re-enter the last server (r), add another server (a), or done (d): a
Enter the information for the next discovery server
Discovery Server ID [0]: 1
Discovery Server IP: 192.168.131.6
Discovery Server Port [11811]:
Re-enter the last server (r), add another server (a), or done (d): d
Configuring:
 ROS_DOMAIN_ID=0
 ROS_DISCOVERY_SERVER="192.168.131.5:11811;192.168.131.6:11811;"
[sudo] password for cpr-1234:
Source your ~/.bashrc file to apply changes