Driving your TurtleBot 4
There are several methods to get your TurtleBot 4 moving.
The robot must first be set up and connected to Wi-Fi before it can be driven. Check out the Setup section if you have not already.
Keyboard Teleoperation
The simplest way to get your robot driving is to use a keyboard application on your PC.
In order to control the Turtlebot 4 while running the application on your pc, you must set up the networking between your robot and your pc, so that they can communicate over ros topics.
You can install the teleop_twist_keyboard package on your PC by running the following commands:
- Warning
ROS 2 Galactic is no longer supported. Please consider upgrading to a newer release
sudo apt install ros-galactic-teleop-twist-keyboardOnce installed, run the node by calling:
ros2 run teleop_twist_keyboard teleop_twist_keyboard -
sudo apt install ros-humble-teleop-twist-keyboardOnce installed, run the node by calling:
ros2 run teleop_twist_keyboard teleop_twist_keyboard -
sudo apt install ros-jazzy-teleop-twist-keyboardOnce installed, run the node by calling:
ros2 run teleop_twist_keyboard teleop_twist_keyboard --ros-args -p stamped:=trueNoteIn Jazzy onwards, the preference is to use stamped messages for control. By default the
teleop_twist_keyboardpackage uses unstamped messages. Therefore thestampedparameter must be set totruemanually when starting the node.
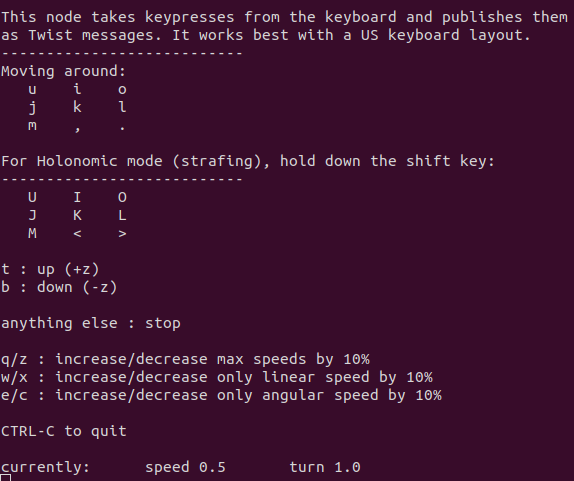
This will start a CLI interface which allows you to press keys to command the robot to drive.

Press i to drive forward, j to rotate left, and so on. You can also adjust linear and angular speeds on the go.
Joystick Teleoperation
If you have a TurtleBot 4 controller or have your own Bluetooth controller, you can drive the robot with it.
First, make sure that your controller is paired and connects to the robot. If you have a TurtleBot 4 controller, press the home button and check that the controller's light turns blue. If your controller is not paired or connecting, refer to the Controller Setup section.
If you are using a TurtleBot 4 Lite with ROS 2 Galactic, the Bluetooth packages will not be installed by default. To install them, SSH into the Raspberry Pi and call sudo bluetooth.sh and then reboot the Pi. Then follow the Controller Setup instructions.
Once your controller is connected, make sure that the joy_teleop nodes are running. These are launched as part of the Standard and Lite launch files under turtlebot4_bringup. If it is not running, you can run it manually by calling:
ros2 launch turtlebot4_bringup joy_teleop.launch.py
The default configuration for the joy_teleop nodes will only work for the TurtleBot 4 controller and PS4 controllers. You may need to create your own config file if the button mappings on your controller differ.
To drive the robot, press and hold either L1 or R1, and move the left joystick. By default, L1 will drive the robot at ‘normal' speeds, and R1 will drive the robot at ‘turbo' speeds. The buttons can be changed in the configuration file.
Command Velocity
Both the keyboard and joystick teleop methods work by sending velocity commands the the robot through the /cmd_vel topic. This topic uses a geometry_msgs/Twist message to tell the robot what linear and angular velocities should be applied.
You can manually publish to this topic through the command line by calling:
- Warning
ROS 2 Galactic is no longer supported. Please consider upgrading to a newer release
ros2 topic pub /cmd_vel geometry_msgs/msg/Twist \ "linear: x: 0.0 y: 0.0 z: 0.0 angular: x: 0.0 y: 0.0 z: 0.0" -
ros2 topic pub /cmd_vel geometry_msgs/msg/Twist \ "linear: x: 0.0 y: 0.0 z: 0.0 angular: x: 0.0 y: 0.0 z: 0.0" -
ros2 topic pub /cmd_vel geometry_msgs/msg/TwistStamped \
"twist:
  linear:
    x: 0.0
    y: 0.0
    z: 0.0
  angular:
    x: 0.0
    y: 0.0
    z: 0.0"
Set the linear.x value to drive the robot forwards or backwards, and the angular.z value to rotate left or right.
Create® 3 Actions
The Create® 3 provides a set of ROS 2 Actions for driving the robot. You can use the DriveDistance, DriveArc, and RotateAngle actions to tell the robot exactly how far and how fast to drive or rotate.
For example, command the robot to drive 0.5 m forwards at 0.3 m/s:
ros2 action send_goal /drive_distance irobot_create_msgs/action/DriveDistance \
"distance: 0.5
max_translation_speed: 0.3"