TurtleBot 4 Common
The turtlebot4 repository contains common packages that are used by both the physical and simulated robot.
Source code is available here.
Installation
The turtlebot4 packages are automatically installed when either of turtlebot4_robot or turtlebot4_simulator is installed. Therefore it comes pre-installed on the robot and is installed when going through the simulation install instructions
Debian package
- Warning
ROS 2 Galactic is no longer supported. Please consider upgrading to a newer release
Individual packages can be installed through apt:
sudo apt update sudo apt install ros-galactic-turtlebot4-description \ ros-galactic-turtlebot4-msgs \ ros-galactic-turtlebot4-navigation \ ros-galactic-turtlebot4-node -
Individual packages can be installed through apt:
sudo apt update sudo apt install ros-humble-turtlebot4-description \ ros-humble-turtlebot4-msgs \ ros-humble-turtlebot4-navigation \ ros-humble-turtlebot4-node -
Individual packages can be installed through apt:
sudo apt update
sudo apt install ros-jazzy-turtlebot4-description \
ros-jazzy-turtlebot4-msgs \
ros-jazzy-turtlebot4-navigation \
ros-jazzy-turtlebot4-node
Source installation
Source installation is an alternative to the debian package and should only be used if the debian package cannot be used or if modifications are being made to the source code.
- Warning
ROS 2 Galactic is no longer supported. Please consider upgrading to a newer release
To manually install this metapackage from source, clone the git repository:
cd ~/turtlebot4_ws/src
git clone https://github.com/turtlebot/turtlebot4.git -b galactic
Install dependencies:
cd ~/turtlebot4_ws
rosdep install --from-path src -yi --rosdistro galactic
Build the packages:
source /opt/ros/galactic/setup.bash
colcon build --symlink-install
Next, the workspace must be sourced on the user computer or on the robot depending on which computer it was installed on.
-
To manually install this metapackage from source, clone the git repository:
cd ~/turtlebot4_ws/src
git clone https://github.com/turtlebot/turtlebot4.git -b humble
Install dependencies:
cd ~/turtlebot4_ws
rosdep install --from-path src -yi --rosdistro humble
Build the packages:
source /opt/ros/humble/setup.bash
colcon build --symlink-install
Next, the workspace must be sourced. If implemented on the robot, source the workspace on the robot by running the
turtlebot4-setuptool and underROS Setupset the workspace as the path to your workspace's setup.bash (/home/ubuntu/turtlebot4_ws/install/setup.bash). If being installed on a user computer then this path must be sourced in the terminal or in the user's.bashrcfile. -
To manually install this metapackage from source, clone the git repository:
cd ~/turtlebot4_ws/src
git clone https://github.com/turtlebot/turtlebot4.git -b jazzy
Install dependencies:
cd ~/turtlebot4_ws
rosdep install --from-path src -yi --rosdistro jazzy
Build the packages:
source /opt/ros/jazzy/setup.bash
colcon build --symlink-install
Next, the workspace must be sourced. If implemented on the robot, source the workspace on the robot by running the
turtlebot4-setuptool and underROS Setupset the workspace as the path to your workspace's setup.bash (/home/ubuntu/turtlebot4_ws/install/setup.bash). If being installed on a user computer then this path must be sourced in the terminal or in the user's.bashrcfile.
Description
The turtlebot4_description package contains the URDF description of the robot and the mesh files for each component.
The description can be published with a robot_state_publisher node.
Messages
The turtlebot4_msgs package contains the custom messages used on the TurtleBot 4:
- UserButton: User Button states.
- UserLed: User Led control.
- UserDisplay: User Display data.
Navigation
The turtlebot4_navigation packages contains launch and configuration files for using SLAM and navigation on the TurtleBot 4. It also contains the TurtleBot 4 Navigator Python node.
- Warning
ROS 2 Galactic is no longer supported. Please consider upgrading to a newer release
Launch files:
- Nav Bringup: Launches navigation. Allows for launch configurations to use SLAM, Nav2, and localization.
- SLAM Sync: Launches
slam_toolboxwith online synchronous mapping. Recommended for use on a PC. - SLAM Async: Launches
slam_toolboxwith online asynchronous mapping. Recommended for use on the Raspberry Pi 4.
Running synchronous SLAM:
ros2 launch turtlebot4_navigation nav_bringup.launch.py slam:=syncRunning asynchronous SLAM with Nav2:
ros2 launch turtlebot4_navigation nav_bringup.launch.py slam:=asyncRunning Nav2 with localization and existing map:
ros2 launch turtlebot4_navigation nav_bringup.launch.py localization:=true slam:=off map:=/path/to/map.yaml -
Launch files:
- Nav2: Launches the Nav2 stack.
- SLAM: Launches
slam_toolboxwith online mapping. - Localization: Launches localization on a given map.
Running synchronous SLAM:
ros2 launch turtlebot4_navigation slam.launch.pyRunning asynchronous SLAM:
ros2 launch turtlebot4_navigation slam.launch.py sync:=falseRunning localization with an existing map:
ros2 launch turtlebot4_navigation localization.launch.py map:=/path/to/map.yamlRunning the Nav2 stack:
ros2 launch turtlebot4_navigation nav2.launch.pyNoteNav2 requires either SLAM or localization to already be running.
-
Launch files:
- Nav2: Launches the Nav2 stack.
- SLAM: Launches
slam_toolboxwith online mapping. - Localization: Launches localization on a given map.
Running synchronous SLAM:
ros2 launch turtlebot4_navigation slam.launch.pyRunning asynchronous SLAM:
ros2 launch turtlebot4_navigation slam.launch.py sync:=falseRunning localization with an existing map:
ros2 launch turtlebot4_navigation localization.launch.py map:=/path/to/map.yamlRunning the Nav2 stack:
ros2 launch turtlebot4_navigation nav2.launch.pyNoteNav2 requires either SLAM or localization to already be running.
TurtleBot 4 Navigator
The TurtleBot 4 Navigator is a Python node that adds TurtleBot 4 specific functionality to the Nav2 Simple Commander. It provides a set of Python methods for navigating the TurtleBot 4. This includes docking, navigating to a pose, following waypoints, and more. Visit the Navigation Tutorials for examples.
TurtleBot 4 Node
The turtlebot4_node package contains the source code for the rclcpp node turtlebot4_node that controls the robots HMI as well as other logic. This node is used by both the physical robot and the simulated robot.
ROS 2 Interfaces
- Warning
ROS 2 Galactic is no longer supported. Please consider upgrading to a newer release
Publishers
Topic Message Type Description hmi/display turtlebot4_msgs/msg/UserDisplay The current information that is to be displayed (TurtleBot 4 model only) ip std_msgs/msg/String The IP address of the Wi-Fi interface Subscribers
Topic Message Type Description battery_state sensor_msgs/msg/BatteryState Current battery state of the Create® 3 hmi/buttons turtlebot4_msgs/msg/UserButton Button states of the TurtleBot 4 HMI (TurtleBot 4 model only) hmi/display/message std_msgs/msg/String User topic to print custom message to display (TurtleBot 4 model only) hmi/led turtlebot4_msgs/msg/UserLed User topic to control User LED 1 and 2 (TurtleBot 4 model only) interface_buttons irobot_create_msgs/msg/InterfaceButtons Button states of Create® 3 buttons joy sensor_msgs/msg/Joy Bluetooth controller button states (TurtleBot 4 model only) wheel_status irobot_create_msgs/msg/WheelStatus Wheel status reported by Create® 3 Service Clients
Service Service Type Description e_stop irobot_create_msgs/srv/EStop Enable or disable motor stop robot_power irobot_create_msgs/srv/RobotPower Power off the robot start_motor std_srvs/srv/Empty Start the RPLIDAR motor stop_motor std_srvs/srv/Empty Stop the RPLIDAR motor Action Clients
Action Action Type Description dock irobot_create_msgs/action/DockServo Command the robot to dock into its charging station wall_follow irobot_create_msgs/action/WallFollow Command the robot to wall follow on left or right side using bump and IR sensors undock irobot_create_msgs/action/Undock Command the robot to undock from its charging station -
Publishers
Topic Message Type Description hmi/display turtlebot4_msgs/msg/UserDisplay The current information that is to be displayed (TurtleBot 4 model only) ip std_msgs/msg/String The IP address of the Wi-Fi interface function_calls std_msgs/msg/String Publishes the name of a button or menu function when it is called Subscribers
Topic Message Type Description battery_state sensor_msgs/msg/BatteryState Current battery state of the Create® 3 hmi/buttons turtlebot4_msgs/msg/UserButton Button states of the TurtleBot 4 HMI (TurtleBot 4 model only) hmi/display/message std_msgs/msg/String User topic to print custom message to display (TurtleBot 4 model only) hmi/led turtlebot4_msgs/msg/UserLed User topic to control User LED 1 and 2 (TurtleBot 4 model only) interface_buttons irobot_create_msgs/msg/InterfaceButtons Button states of Create® 3 buttons joy sensor_msgs/msg/Joy Bluetooth controller button states wheel_status irobot_create_msgs/msg/WheelStatus Wheel status reported by Create® 3 Service Clients
Service Service Type Description e_stop irobot_create_msgs/srv/EStop Enable or disable motor stop robot_power irobot_create_msgs/srv/RobotPower Power off the robot start_motor std_srvs/srv/Empty Start the RPLIDAR motor stop_motor std_srvs/srv/Empty Stop the RPLIDAR motor Action Clients
Action Action Type Description dock irobot_create_msgs/action/Dock Command the robot to dock into its charging station wall_follow irobot_create_msgs/action/WallFollow Command the robot to wall follow on left or right side using bump and IR sensors undock irobot_create_msgs/action/Undock Command the robot to undock from its charging station -
Publishers
Topic Message Type Description hmi/display turtlebot4_msgs/msg/UserDisplay The current information that is to be displayed (TurtleBot 4 model only) ip std_msgs/msg/String The IP address of the Wi-Fi interface function_calls std_msgs/msg/String Publishes the name of a button or menu function when it is called Subscribers
Topic Message Type Description battery_state sensor_msgs/msg/BatteryState Current battery state of the Create® 3 hmi/buttons turtlebot4_msgs/msg/UserButton Button states of the TurtleBot 4 HMI (TurtleBot 4 model only) hmi/display/message std_msgs/msg/String User topic to print custom message to display (TurtleBot 4 model only) hmi/led turtlebot4_msgs/msg/UserLed User topic to control User LED 1 and 2 (TurtleBot 4 model only) interface_buttons irobot_create_msgs/msg/InterfaceButtons Button states of Create® 3 buttons joy sensor_msgs/msg/Joy Bluetooth controller button states wheel_status irobot_create_msgs/msg/WheelStatus Wheel status reported by Create® 3 Service Clients
Service Service Type Description e_stop irobot_create_msgs/srv/EStop Enable or disable motor stop robot_power irobot_create_msgs/srv/RobotPower Power off the robot start_motor std_srvs/srv/Empty Start the RPLIDAR motor stop_motor std_srvs/srv/Empty Stop the RPLIDAR motor Action Clients
Action Action Type Description dock irobot_create_msgs/action/Dock Command the robot to dock into its charging station wall_follow irobot_create_msgs/action/WallFollow Command the robot to wall follow on left or right side using bump and IR sensors undock irobot_create_msgs/action/Undock Command the robot to undock from its charging station
Functions
The node has a set of static functions that can be used either with a button or through the display menu.
| Function name | Description |
|---|---|
| Dock | Call the dock action |
| Undock | Call the undock action |
| Wall Follow Left | Call the wall_follow action with direction FOLLOW_LEFT and a duration of 10 seconds. |
| Wall Follow Right | Call the wall_follow action with direction FOLLOW_RIGHT and a duration of 10 seconds. |
| Power | Call the robot_power service to power off the robot |
| EStop | Call the e_stop action to toggle the EStop state |
| Scroll Up | Scroll menu up (TurtleBot 4 model only) |
| Scroll Down | Scroll menu down (TurtleBot 4 model only) |
| Back | Exit message screen or return to first menu entry (TurtleBot 4 model only) |
| Select | Select currently highlighted menu entry (TurtleBot 4 model only) |
| Help | Print help statement on the display (TurtleBot 4 model only) |
Configuration
This node can be configured using a parameter .yaml file. The default robot parameters can be found here.
Parameters
| Parameter | Parameter type | Description |
|---|---|---|
| wifi.interface | String | The Wi-Fi interface being used by the computer. This is used to find the current IP address of the computer |
| menu.entries | List of Strings | Set menu entries to be displayed |
| buttons | Key Value pairs | Set the function of Create® 3 and HMI buttons |
| controller | Key Value pairs | Set the function of TurtleBot 4 Controller buttons |
Buttons
The Buttons class in turtlebot4_node provides functionality to all buttons on the robot. This includes the Create® 3 buttons, HMI buttons, and TurtleBot 4 Controller buttons. The node receives button states from the interface_buttons, hmi/buttons, and joy topics.
Each button can be configured to have either a single function when pressed, or two functions by using a short or long press. This is done through configuration.
Supported buttons:
buttons:
    create3_1:
    create3_power:
    create3_2:
    hmi_1:
    hmi_2:
    hmi_3:
    hmi_4:

controller:
    a:
    b:
    x:
    y:
    up:
    down:
    left:
    right:
    l1:
    l2:
    l3:
    r1:
    r2:
    r3:
    share:
    options:
    home:
Example
Lets say we want the TurtleBot 4 to have the following button functions:
- Make a short press of Create® 3 button 1 toggle EStop.
- Power off robot with 5 second press of Home on the TurtleBot 4 Controller.
- Short press of HMI button 1 performs Wall Follow Left, long press of 3 seconds performs Wall Follow Right.
Create a new yaml file:
cd /home/ubuntu/turtlebot4_ws
touch example.yaml
Use your favourite text editor and paste the following into example.yaml:
turtlebot4_node:
  ros__parameters:
    buttons:
      create3_1: ["EStop"]
      hmi_1: ["Wall Follow Left", "Wall Follow Right", "3000"]

    controller:
      home: ["Power", "5000"]
Launch the robot with your new configuration:
ros2 launch turtlebot4_bringup standard.launch.py param_file:=/home/ubuntu/turtlebot4_ws/example.yaml
The buttons should now behave as described in example.yaml.
LEDs
The Leds class in turtlebot4_node controls the states of the HMI LEDs on the TurtleBot 4. It is not used for the TurtleBot 4 Lite.
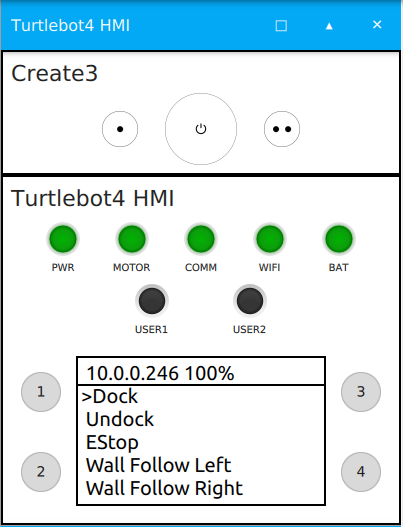
Status LEDs
The status LEDs are controlled by the turtlebot4_node.
| LED | Colour | Description |
|---|---|---|
| POWER | Green | Always ON |
| MOTOR | Green | ON when wheels are enabled, OFF when wheels are disabled |
| COMMS | Green | ON when communication with the Create® 3 is active. OFF otherwise |
| WIFI | Green | ON when a valid IP address can be found for the specified Wi-Fi interface |
| BATTERY | Green, Yellow, Red | Colour will reflect battery percentage |
Battery LED state
| Battery Percentage | Colour |
|---|---|
| 50-100 | Green |
| 20-50 | Yellow |
| 12-20 | Red |
| 0-12 | Blinking Red |
User LEDs
The user LEDs can be set by publishing to the hmi/led topic with a UserLed message.
| LED | Colour | Description |
|---|---|---|
| USER_1 | Green | User Controlled |
| USER_2 | Green, Yellow, Red | User Controlled |
Examples
Set USER_1 to solid green:
ros2 topic pub /hmi/led turtlebot4_msgs/msg/UserLed "led: 0
color: 1
blink_period: 1000
duty_cycle: 1.0" --once
Set USER_1 OFF:
ros2 topic pub /hmi/led turtlebot4_msgs/msg/UserLed "led: 0
color: 0
blink_period: 1000
duty_cycle: 1.0" --once
Blink USER_2 red at 1hz with 50% duty cycle:
ros2 topic pub /hmi/led turtlebot4_msgs/msg/UserLed "led: 1
color: 2
blink_period: 1000
duty_cycle: 0.5" --once

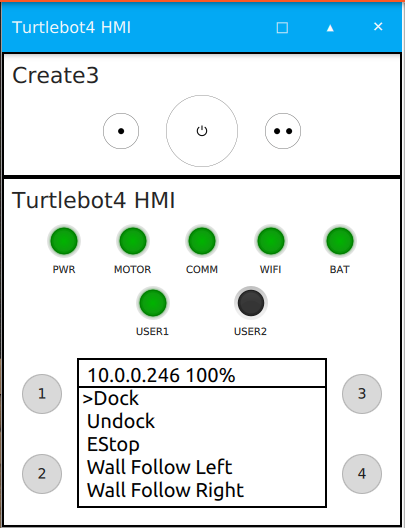
Display
The Display class in turtlebot4_node controls the HMI display of the TurtleBot 4. The physical display is a 128x64 OLED which is controlled over I2C with a SSD1306 driver.
The display has a header line which contains the IP address of the Wi-Fi interface specified in configuration, as well as the battery percentage received on the /battery_state topic. The display also has 5 additional lines which are used for the menu by default. The menu entries are specified in configuration and are a set of the available functions. The 5 menu lines can be overwritten by publishing to the /hmi/display/message with a String message.
The menu can have any number of entries. If there are more than 5 entries, the user will have to scroll down to see the entries that do not fit on the 5 menu lines.
Menu Control
The TurtleBot 4 display has a simple scrolling menu. There are 4 control functions for the menu: Scroll up, Scroll down, Select, and Back.
- Scroll up and down allow the users to navigate through the menu entries and by default are mapped to user buttons 3 and 4 respectively.
- The select function will call the currently selected menu entry. This can trigger an action such as docking, a service such as EStop, or display a message such as the Help message. This function is mapped to user button 1 by default.
- The back function allows the user to return back to the menu from a message screen. If the menu is already showing the menu entries, it will return to showing the first 5 menu entries and the first entry will be highlighted.
