Simple Discovery
The TurtleBot 4 should be configured for either Simple Discovery or Discovery Server, not both.
See Networking for details.
Create® 3
To use the TurtleBot 4 with Simple Discovery, the Create® 3 should be connected to Wi-Fi.
The Create® 3 can only be connected to 2.4 GHz Wi-Fi networks.
Wi-Fi Setup
-
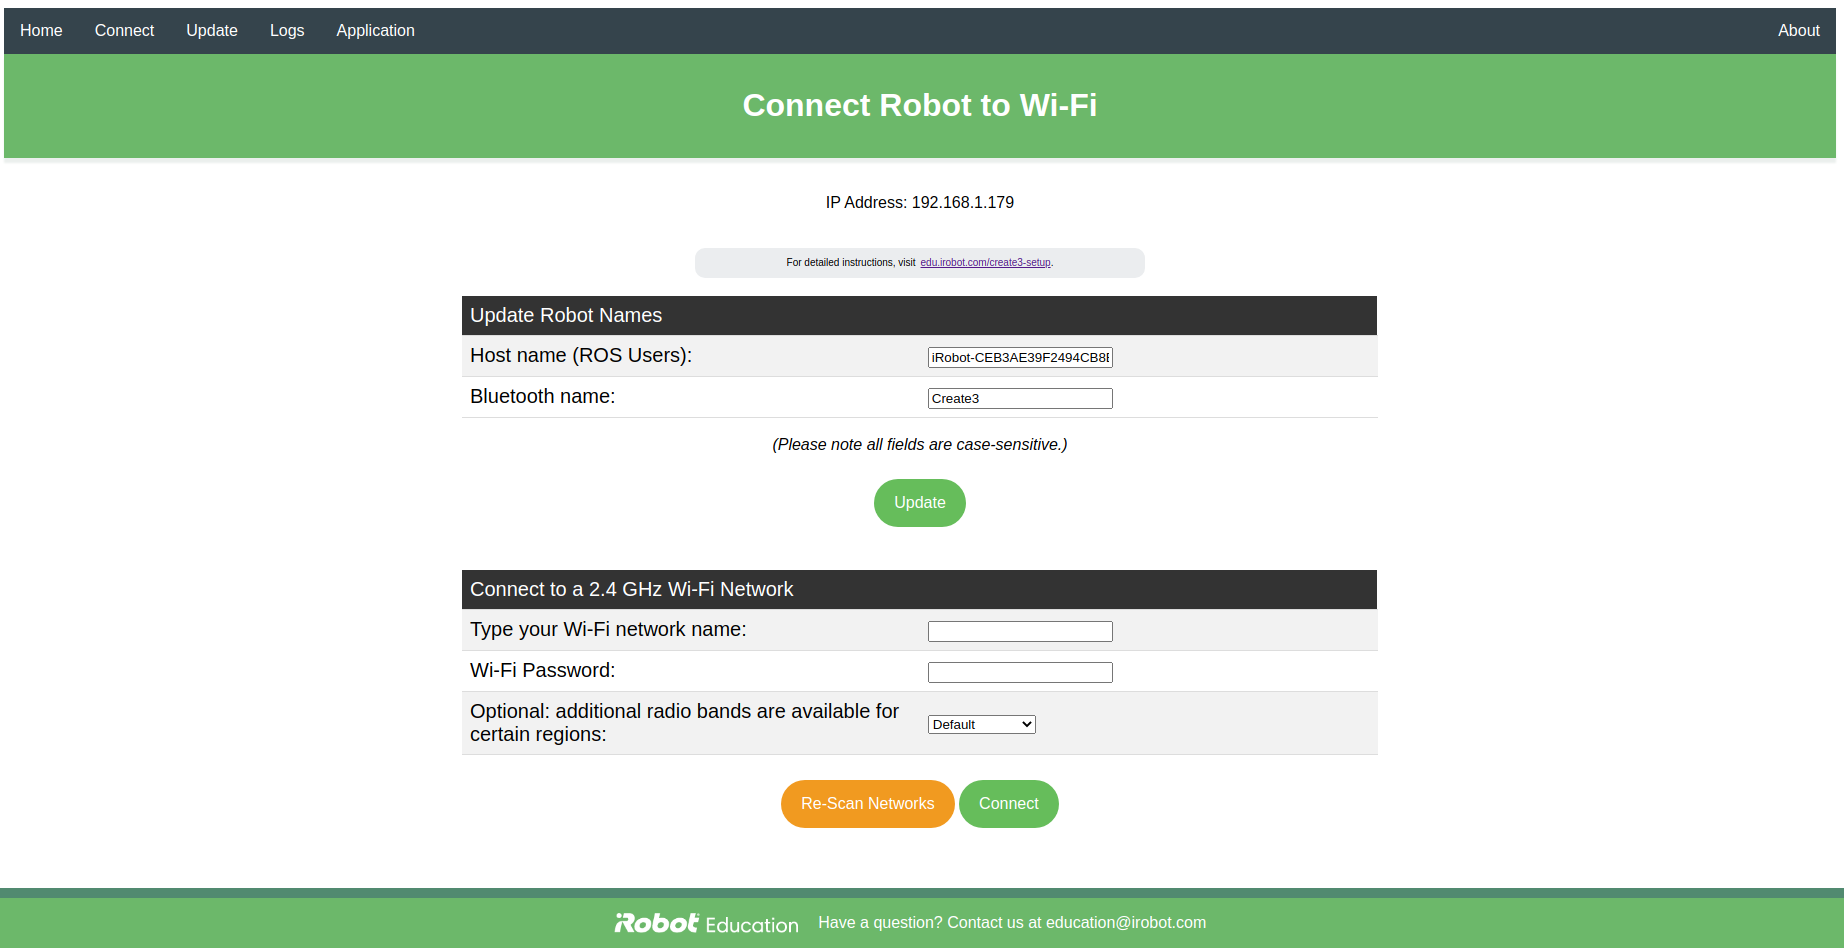
Access the Create® 3 webserver, then navigate to the Connect tab. Enter your Wi-Fi SSID and password, and then click ‘Connect'. Wait for it to initiate the WiFi connection, and then play a "happy sound" to signal successful connection. This may take a couple minutes. Click on the Connect tab once again and it should now show an IP address if the connection was successful. If the light ring turns yellow during this process, it indicates an error in connection. See the Create® 3 documentation to understand what the different light ring colors indicate.
NoteIf the Create® 3 is unable to connect to your 2.4 GHz WiFi network and the light ring does not show any particular error color, press and hold both Buttons 1 and 2 on the Create® 3 for about 5 seconds until the light ring shows spinning blue light. Now, reload the <b>Connect</b> page and try again. You may hear several chimes, but you must wait until the light ring color changes.
Connecting the Create® 3 to Wi-Fi -
The Create® 3 must not be connected to Wifi when using ROS 2 Jazzy. All communication between the Raspberry Pi and the Create® 3 is done over the internal wired connection. The
create3_republishernode ensures that all ROS 2 topics, services, and actions from the Create® 3 are accessible by other computers on the same wireless network.To disconnect the Create® 3 from wi-fi, access the Create® 3 webserver and choose the "Forget wi-fi settings" item from the menu at the top of the screen.
Application Configuration
-
Access the Create® 3 webserver, then navigate to the Application Configuration tab. Set ROS 2 Domain ID to 0, ROS 2 Namespace to an empty string, and RMW_IMPLEMENTATION to the default for your ROS 2 version. Additionally, make sure that the Fast DDS discovery server is disabled.
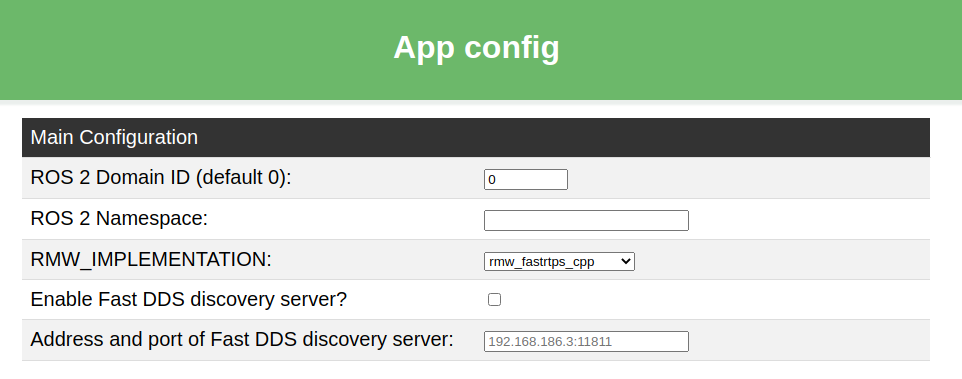
Configuring the Create® 3 application for Galactic -
Use the
turtlebot4-setuptool to configure the Create® 3. You can access the Create® 3 webserver and navigate to the Application Configuration tab to confirm the configuration as follows:- ROS 2 Domain ID is
0 - ROS 2 Namespace is empty
- RMW Implementation is set to the default for your ROS 2 version
- Fast DDS Discovery Server is disabled
Configuring the Create® 3 application for Humble - ROS 2 Domain ID is
-
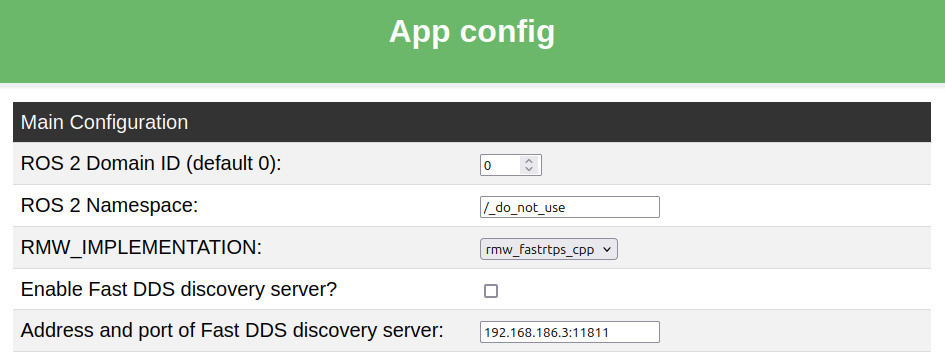
Use the
turtlebot4-setuptool to configure the Create® 3. You can access the Create® 3 webserver and navigate to the Application Configuration tab to confirm the configuration as follows:- ROS 2 Domain ID is
0 - ROS 2 Namespace is
/_do_not_use - RMW Implementation is set to the default for your firmware
- Fast DDS Discovery Server is disabled
Configuring the Create® 3 application for Jazzy - ROS 2 Domain ID is
User PC
The user PC should be configured to use the same DDS vendor and ROS_DOMAIN_ID as the robot. It is recommended to use the default DDS for your ROS 2 version.
- Warning
ROS 2 Galactic is no longer supported. Please consider upgrading to a newer release
Create a file called
setup.bashin a convenient location:sudo mkdir /etc/turtlebot4/ sudo touch /etc/turtlebot4/setup.bashAdd the following lines to
setup.bashwith your favourite text editor:source /opt/ros/galactic/setup.bash export ROS_DOMAIN_ID=0 export RMW_IMPLEMENTATION=rmw_cyclonedds_cppTipSource your workspaces and export any other environment variables in this file.
Finally, add the following line in
~/.bashrcto apply the settings to every new terminal:source /etc/turtlebot4/setup.bashNoteCall
source ~/.bashrcto apply these settings to your current terminal. -
Create a file called
setup.bashin a convenient location:sudo mkdir /etc/turtlebot4/ sudo touch /etc/turtlebot4/setup.bashAdd the following lines to
setup.bashwith your favourite text editor:source /opt/ros/humble/setup.bash export ROS_DOMAIN_ID=0 export RMW_IMPLEMENTATION=rmw_fastrtps_cppTipSource your workspaces and export any other environment variables in this file.
Finally, add the following line in
~/.bashrcto apply the settings to every new terminal:source /etc/turtlebot4/setup.bashNoteCall
source ~/.bashrcto apply these settings to your current terminal. -
Create a file called
setup.bashin a convenient location:sudo mkdir /etc/turtlebot4/ sudo touch /etc/turtlebot4/setup.bashAdd the following lines to
setup.bashwith your favourite text editor:source /opt/ros/jazzy/setup.bash export ROS_DOMAIN_ID=0 export RMW_IMPLEMENTATION=rmw_fastrtps_cppTipSource your workspaces and export any other environment variables in this file.
Finally, add the following line in
~/.bashrcto apply the settings to every new terminal:source /etc/turtlebot4/setup.bashNoteCall
source ~/.bashrcto apply these settings to your current terminal.
Additional CycloneDDS configuration
If using CycloneDDS, the user PC needs further configuration to see the robot topics properly. CycloneDDS is configured in an XML file, and that configuration should be applied to the CYCLONEDDS_URI environment variable. An example XML file is available here. Download this file to your PC by calling:
wget https://raw.githubusercontent.com/turtlebot/turtlebot4_setup/galactic/conf/cyclonedds_pc.xml
The DontRoute setting is required to see the Create® 3 topics.
Move the xml file to a convenient location:
sudo mv cyclonedds_pc.xml /etc/turtlebot4/
Add this line to your /etc/turtlebot4/setup.bash file to automatically configure CycloneDDS each time you open a new terminal:
export CYCLONEDDS_URI=/etc/turtlebot4/cyclonedds_pc.xml
Call source ~/.bashrc to apply these settings to your current terminal.
For more CycloneDDS configuration options, visit the CycloneDDS documentation.
Verification
Verify that your PC and the robot are able to communicate using ROS topics. Run the following command on both the robot and you PC to display the Raspberry Pi and Create®3 ROS topics and ensure that both outputs match:
ros2 topic list