Creating your first node (C++)
This tutorial will go through the steps of creating a ROS 2 package and writing a ROS 2 node in C++. For a Python example, click here.
- Warning
ROS 2 Galactic is no longer supported. Please consider upgrading to a newer release
These steps are similar to the ROS 2 Tutorial, but focus on interacting with the TurtleBot 4. For source code, click here.
-
These steps are similar to the ROS 2 Tutorial, but focus on interacting with the TurtleBot 4. For source code, click here.
-
These steps are similar to the ROS 2 Tutorial, but focus on interacting with the TurtleBot 4. For source code, click here.
You can follow this tutorial on either the Raspberry Pi of your TurtleBot 4, or your PC.
Create a workspace
If you do not already have a workspace, open a terminal and create one in the directory of your choice:
mkdir ~/turtlebot4_ws/src -p
Create a package and node
- Warning
ROS 2 Galactic is no longer supported. Please consider upgrading to a newer release
You will need to create a ROS 2 package to hold your files. For this tutorial, we will create a package called
turtlebot4_cpp_tutorialswith a node calledturtlebot4_first_cpp_node.source /opt/ros/galactic/setup.bash cd ~/turtlebot4_ws/src ros2 pkg create --build-type ament_cmake --node-name turtlebot4_first_cpp_node turtlebot4_cpp_tutorials -
You will need to create a ROS 2 package to hold your files. For this tutorial, we will create a package called
turtlebot4_cpp_tutorialswith a node calledturtlebot4_first_cpp_node.source /opt/ros/humble/setup.bash cd ~/turtlebot4_ws/src ros2 pkg create --build-type ament_cmake --node-name turtlebot4_first_cpp_node turtlebot4_cpp_tutorials -
You will need to create a ROS 2 package to hold your files. For this tutorial, we will create a package called
turtlebot4_cpp_tutorialswith a node calledturtlebot4_first_cpp_node.source /opt/ros/jazzy/setup.bash cd ~/turtlebot4_ws/src ros2 pkg create --build-type ament_cmake --node-name turtlebot4_first_cpp_node turtlebot4_cpp_tutorials
This will create a turtlebot4_cpp_tutorials folder and populate it with a basic "Hello World" node, as well as the CMakeLists.txt and package.xml files required for a ROS 2 C++ package.
Write your node
The next step is to start coding. For this tutorial, our goal will be to use the Create® 3 interface button 1 to change the colour of the Create® 3 lightring. Open up the "Hello World" .cpp file located at ~/turtlebot4_ws/src/turtlebot4_cpp_tutorials/src/turtlebot4_first_cpp_node.cpp in your favourite text editor.
Add your dependencies
For this tutorial, we will need to use the rclcpp and irobot_create_msgs packages. The rclcpp package allows us to create ROS 2 nodes and gives us full access to all the base ROS 2 functionality in C++. The irobot_create_msgs package gives us access to the custom messages used by the Create® 3 for reading the button presses and controlling the lightring.
In your CMakeLists.txt file, add these lines under find_package(ament_cmake REQUIRED):
find_package(rclcpp REQUIRED)
find_package(irobot_create_msgs REQUIRED)
and add this line under add_executable(turtlebot4_first_cpp_node src/turtlebot4_first_cpp_node.cpp):
ament_target_dependencies(turtlebot4_first_cpp_node rclcpp irobot_create_msgs)
In package.xml, add these lines under <buildtool_depend>ament_cmake</buildtool_depend>:
<depend>rclcpp</depend>
<depend>irobot_create_msgs</depend>
Finally, in your nodes .cpp file you will need to include these headers:
#include <chrono>
#include <functional>
#include <memory>
#include <string>

#include "rclcpp/rclcpp.hpp"

#include "irobot_create_msgs/msg/interface_buttons.hpp"
#include "irobot_create_msgs/msg/lightring_leds.hpp"
Create a class
Now that the dependencies are set, we can create a class that inherits from the rclcpp::Node class. We will call this class TurtleBot4FirstNode.
class TurtleBot4FirstNode : public rclcpp::Node
{
public:
  TurtleBot4FirstNode()
  : Node("turtlebot4_first_cpp_node")
  {}
};
Notice that our class calls the Node constructor and passes it the name of our node, turtlebot4_first_cpp_node.
We can now create our node in the main function and spin it. Since our node is empty, the node will be created but it won't do anything.
int main(int argc, char * argv[])
{
  rclcpp::init(argc, argv);
  rclcpp::spin(std::make_shared<TurtleBot4FirstNode>());
  rclcpp::shutdown();
  return 0;
}
Subscribe to the Create® 3 interface buttons
Our next step is to subscribe to the Create® 3 interface buttons topic to receive button presses.
The Create® 3 interface buttons will still execute their standard operations. Pressing button 1 will direct the robot to dock (if it is currently undocked) and pressing button 2 will direct the robot to undock (if it is currently docked).
We will need to create a rclcpp::Subscription as well as a callback function for the subscription. The callback function will be called every time we receive a message on the interface buttons topic.
class TurtleBot4FirstNode : public rclcpp::Node
{
public:
  TurtleBot4FirstNode()
  : Node("turtlebot4_first_cpp_node")
  {
    // Subscribe to the /interface_buttons topic
    interface_buttons_subscriber_ =
      this->create_subscription<irobot_create_msgs::msg::InterfaceButtons>(
      "/interface_buttons",
      rclcpp::SensorDataQoS(),
      std::bind(&TurtleBot4FirstNode::interface_buttons_callback, this, std::placeholders::_1));
  }

private:
  // Interface buttons subscription callback
  void interface_buttons_callback(
    const irobot_create_msgs::msg::InterfaceButtons::SharedPtr create3_buttons_msg)
  {}

  // Interface Button Subscriber
  rclcpp::Subscription<irobot_create_msgs::msg::InterfaceButtons>::SharedPtr interface_buttons_subscriber_;
};
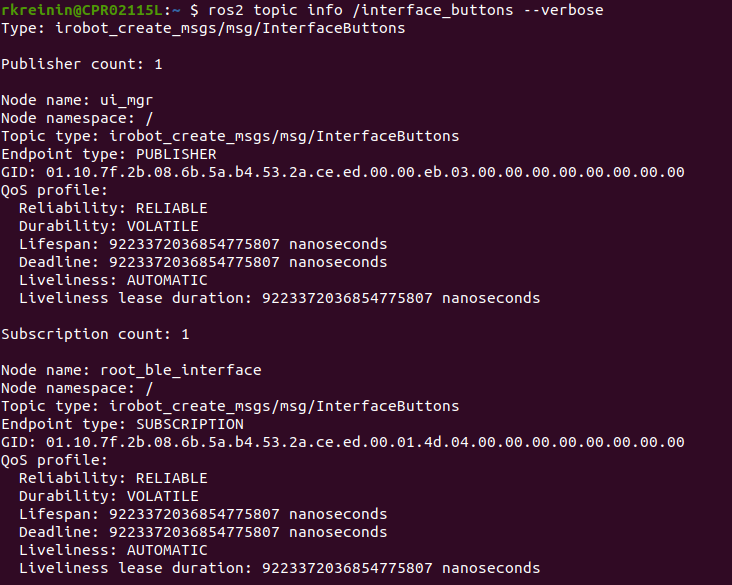
Notice that the interface_buttons_subscriber_ uses the InterfaceButtons message type, and the quality of service is rclcpp::SensorDataQoS(). These parameters must match the topic, otherwise the subscription will fail. If you are unsure what message type or QoS a topic is using, you can use the ROS 2 CLI to find this information.
Call ros2 topic info /<topic> --verbose to get the full details.
Test Create® 3 Button 1
Now that we are subscribed, lets test out our node by printing a message every time button 1 is pressed.
Edit the interface_buttons_callback function to look like this:
  // Interface buttons subscription callback
  void interface_buttons_callback(
    const irobot_create_msgs::msg::InterfaceButtons::SharedPtr create3_buttons_msg)
  {
    // Button 1 is pressed
    if (create3_buttons_msg->button_1.is_pressed) {
      RCLCPP_INFO(this->get_logger(), "Button 1 Pressed!");
    }
  }
Now every time we receive a message on the /interface_buttons topic we will check if button 1 is pressed, and if it is then the node will print a message.
To test this out, we will need to build our package using colcon:
cd ~/turtlebot4_ws
colcon build --packages-select turtlebot4_cpp_tutorials
source install/local_setup.bash
The --packages-select flag allows you to enter any number of packages that you want to build, in case you don't want to build all packages in your workspace.
Now, try running the node:
ros2 run turtlebot4_cpp_tutorials turtlebot4_first_cpp_node
When you run it, nothing will happen until you press button 1 on your TurtleBot 4.
Press the button, and you should see this message in your terminal:
[INFO] [1652379086.090977658] [turtlebot4_first_cpp_node]: Button 1 Pressed!
Printing messages like this is a great way to debug your code.
Create a lightring publisher
Now that we can receive a button press, lets create a lightring publisher.
class TurtleBot4FirstNode : public rclcpp::Node
{
public:
  TurtleBot4FirstNode()
  : Node("turtlebot4_first_cpp_node")
  {
    // Subscribe to the /interface_buttons topic
    interface_buttons_subscriber_ =
      this->create_subscription<irobot_create_msgs::msg::InterfaceButtons>(
      "/interface_buttons",
      rclcpp::SensorDataQoS(),
      std::bind(&TurtleBot4FirstNode::interface_buttons_callback, this, std::placeholders::_1));

    // Create a publisher for the /cmd_lightring topic
    lightring_publisher_ = this->create_publisher<irobot_create_msgs::msg::LightringLeds>(
      "/cmd_lightring",
      rclcpp::SensorDataQoS());
  }

private:
  // Interface buttons subscription callback
  void interface_buttons_callback(
    const irobot_create_msgs::msg::InterfaceButtons::SharedPtr create3_buttons_msg)
  {
    // Button 1 is pressed
    if (create3_buttons_msg->button_1.is_pressed) {
      RCLCPP_INFO(this->get_logger(), "Button 1 Pressed!");
    }
  }

  // Interface Button Subscriber
  rclcpp::Subscription<irobot_create_msgs::msg::InterfaceButtons>::SharedPtr interface_buttons_subscriber_;
  // Lightring Publisher
  rclcpp::Publisher<irobot_create_msgs::msg::LightringLeds>::SharedPtr lightring_publisher_;
};
The Lightring publisher uses the LightringLeds message type.
Next, lets create a function that will populate a LightringLeds message, and publish it.
Add this code below your interface_buttons_callback function:
  // Perform this function when Button 1 is pressed.
  void button_1_function()
  {
    // Create a ROS 2 message
    auto lightring_msg = irobot_create_msgs::msg::LightringLeds();
    // Stamp the message with the current time
    lightring_msg.header.stamp = this->get_clock()->now();

    // Override system lights
    lightring_msg.override_system = true;

    // LED 0
    lightring_msg.leds[0].red = 255;
    lightring_msg.leds[0].blue = 0;
    lightring_msg.leds[0].green = 0;

    // LED 1
    lightring_msg.leds[1].red = 0;
    lightring_msg.leds[1].blue = 255;
    lightring_msg.leds[1].green = 0;

    // LED 2
    lightring_msg.leds[2].red = 0;
    lightring_msg.leds[2].blue = 0;
    lightring_msg.leds[2].green = 255;

    // LED 3
    lightring_msg.leds[3].red = 255;
    lightring_msg.leds[3].blue = 255;
    lightring_msg.leds[3].green = 0;

    // LED 4
    lightring_msg.leds[4].red = 255;
    lightring_msg.leds[4].blue = 0;
    lightring_msg.leds[4].green = 255;

    // LED 5
    lightring_msg.leds[5].red = 0;
    lightring_msg.leds[5].blue = 255;
    lightring_msg.leds[5].green = 255;
    // Publish the message
    lightring_publisher_->publish(lightring_msg);
  }
This function creates a LightringLeds message and populates the parameters.
We first stamp the message with the current time:
lightring_msg.header.stamp = this->get_clock()->now();
Then we set the override_system parameter to true so that our command overrides whatever commands the Create® 3 is sending to the lightring.
lightring_msg.override_system = true;
Next, we populate the 6 LEDs in the leds array with whatever colours we want.
// LED 0
lightring_msg.leds[0].red = 255;
lightring_msg.leds[0].blue = 0;
lightring_msg.leds[0].green = 0;

// LED 1
lightring_msg.leds[1].red = 0;
lightring_msg.leds[1].blue = 255;
lightring_msg.leds[1].green = 0;

// LED 2
lightring_msg.leds[2].red = 0;
lightring_msg.leds[2].blue = 0;
lightring_msg.leds[2].green = 255;

// LED 3
lightring_msg.leds[3].red = 255;
lightring_msg.leds[3].blue = 255;
lightring_msg.leds[3].green = 0;

// LED 4
lightring_msg.leds[4].red = 255;
lightring_msg.leds[4].blue = 0;
lightring_msg.leds[4].green = 255;

// LED 5
lightring_msg.leds[5].red = 0;
lightring_msg.leds[5].blue = 255;
lightring_msg.leds[5].green = 255;
Each RGB value can be set between 0 and 255. You can look up the RGB value of any color and set it here.
Finally, we publish the message.
lightring_publisher_->publish(lightring_msg);
Publish the lightring command with a button press
Now we can connect our interface button subscription to our lightring publisher. Simply call button_1_function inside the interface_buttons_callback.
  // Interface buttons subscription callback
  void interface_buttons_callback(
    const irobot_create_msgs::msg::InterfaceButtons::SharedPtr create3_buttons_msg)
  {
    // Button 1 is pressed
    if (create3_buttons_msg->button_1.is_pressed) {
      RCLCPP_INFO(this->get_logger(), "Button 1 Pressed!");

      button_1_function();
    }
  }
Test this out by building the package and running the node like before.
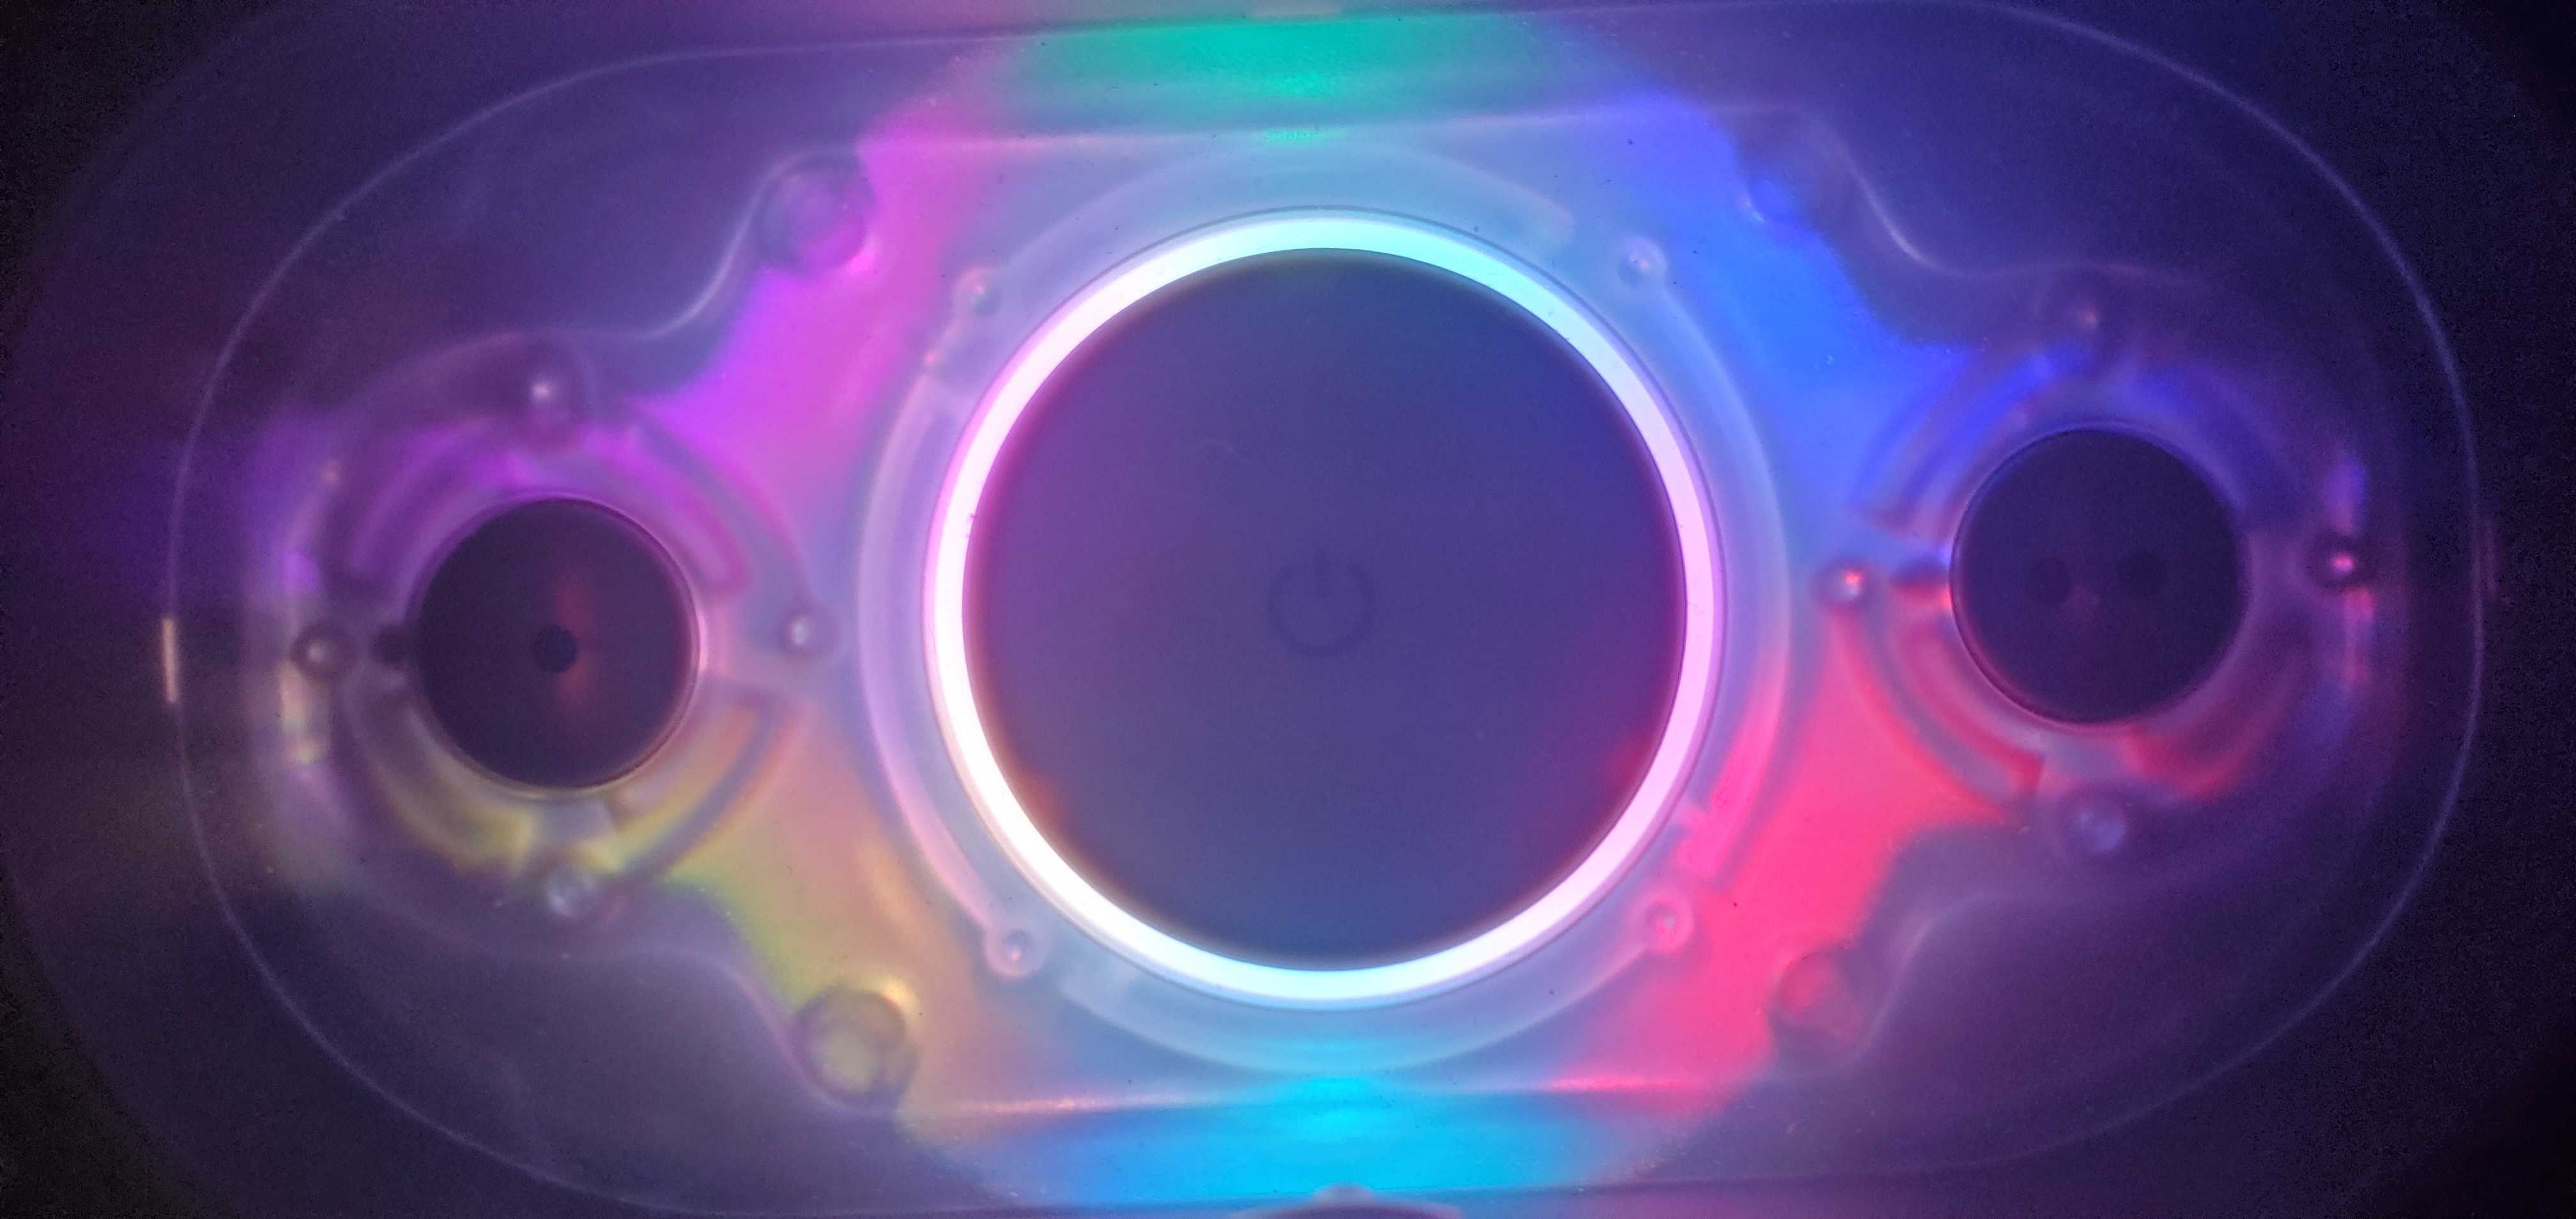
Press button 1 and the lightring light should look like this:
Toggle the lightring
You will notice that once you have set the lightrings LEDs they will remain like that forever. Lets make the button toggle the light on or off each time we press it.
Add a boolean to keep track of the light state:
bool lights_on_;
Initialize the boolean in the class constructor:
TurtleBot4FirstNode()
  : Node("turtlebot4_first_cpp_node"), lights_on_(false)
And modify button_1_function to toggle the light:
  void button_1_function()
  {
    // Create a ROS 2 message
    auto lightring_msg = irobot_create_msgs::msg::LightringLeds();
    // Stamp the message with the current time
    lightring_msg.header.stamp = this->get_clock()->now();

    // Lights are currently off
    if (!lights_on_) {
      // Override system lights
      lightring_msg.override_system = true;

      // LED 0
      lightring_msg.leds[0].red = 255;
      lightring_msg.leds[0].blue = 0;
      lightring_msg.leds[0].green = 0;

      // LED 1
      lightring_msg.leds[1].red = 0;
      lightring_msg.leds[1].blue = 255;
      lightring_msg.leds[1].green = 0;

      // LED 2
      lightring_msg.leds[2].red = 0;
      lightring_msg.leds[2].blue = 0;
      lightring_msg.leds[2].green = 255;

      // LED 3
      lightring_msg.leds[3].red = 255;
      lightring_msg.leds[3].blue = 255;
      lightring_msg.leds[3].green = 0;

      // LED 4
      lightring_msg.leds[4].red = 255;
      lightring_msg.leds[4].blue = 0;
      lightring_msg.leds[4].green = 255;

      // LED 5
      lightring_msg.leds[5].red = 0;
      lightring_msg.leds[5].blue = 255;
      lightring_msg.leds[5].green = 255;
    }
    // Lights are currently on
    else {
      // Disable system override. The system will take back control of the lightring.
      lightring_msg.override_system = false;
    }
    // Publish the message
    lightring_publisher_->publish(lightring_msg);
    // Toggle the lights on status
    lights_on_ = !lights_on_;
  }
Now the Create® 3 will regain control of the lightring if we press button 1 again.
Your first C++ Node
You have finished writing your first C++ node! The final .cpp file should look like this:
#include <chrono>
#include <functional>
#include <memory>
#include <string>

#include "rclcpp/rclcpp.hpp"

#include "irobot_create_msgs/msg/interface_buttons.hpp"
#include "irobot_create_msgs/msg/lightring_leds.hpp"

class TurtleBot4FirstNode : public rclcpp::Node
{
public:
  TurtleBot4FirstNode()
  : Node("turtlebot4_first_cpp_node"), lights_on_(false)
  {
    // Subscribe to the /interface_buttons topic
    interface_buttons_subscriber_ =
      this->create_subscription<irobot_create_msgs::msg::InterfaceButtons>(
      "/interface_buttons",
      rclcpp::SensorDataQoS(),
      std::bind(&TurtleBot4FirstNode::interface_buttons_callback, this, std::placeholders::_1));

    // Create a publisher for the /cmd_lightring topic
    lightring_publisher_ = this->create_publisher<irobot_create_msgs::msg::LightringLeds>(
      "/cmd_lightring",
      rclcpp::SensorDataQoS());
  }

private:
  // Interface buttons subscription callback
  void interface_buttons_callback(
    const irobot_create_msgs::msg::InterfaceButtons::SharedPtr create3_buttons_msg)
  {
    // Button 1 is pressed
    if (create3_buttons_msg->button_1.is_pressed) {
      RCLCPP_INFO(this->get_logger(), "Button 1 Pressed!");

      button_1_function();
    }
  }

  // Perform a function when Button 1 is pressed.
  void button_1_function()
  {
    // Create a ROS 2 message
    auto lightring_msg = irobot_create_msgs::msg::LightringLeds();
    // Stamp the message with the current time
    lightring_msg.header.stamp = this->get_clock()->now();

    // Lights are currently off
    if (!lights_on_) {
      // Override system lights
      lightring_msg.override_system = true;

      // LED 0
      lightring_msg.leds[0].red = 255;
      lightring_msg.leds[0].blue = 0;
      lightring_msg.leds[0].green = 0;

      // LED 1
      lightring_msg.leds[1].red = 0;
      lightring_msg.leds[1].blue = 255;
      lightring_msg.leds[1].green = 0;

      // LED 2
      lightring_msg.leds[2].red = 0;
      lightring_msg.leds[2].blue = 0;
      lightring_msg.leds[2].green = 255;

      // LED 3
      lightring_msg.leds[3].red = 255;
      lightring_msg.leds[3].blue = 255;
      lightring_msg.leds[3].green = 0;

      // LED 4
      lightring_msg.leds[4].red = 255;
      lightring_msg.leds[4].blue = 0;
      lightring_msg.leds[4].green = 255;

      // LED 5
      lightring_msg.leds[5].red = 0;
      lightring_msg.leds[5].blue = 255;
      lightring_msg.leds[5].green = 255;
    }
    // Lights are currently on
    else {
      // Disable system override. The system will take back control of the lightring.
      lightring_msg.override_system = false;
    }
    // Publish the message
    lightring_publisher_->publish(lightring_msg);
    // Toggle the lights on status
    lights_on_ = !lights_on_;
  }

  // Interface Button Subscriber
  rclcpp::Subscription<irobot_create_msgs::msg::InterfaceButtons>::SharedPtr
    interface_buttons_subscriber_;
  // Lightring Publisher
  rclcpp::Publisher<irobot_create_msgs::msg::LightringLeds>::SharedPtr lightring_publisher_;
  // Lights on status
  bool lights_on_;
};

int main(int argc, char * argv[])
{
  rclcpp::init(argc, argv);
  rclcpp::spin(std::make_shared<TurtleBot4FirstNode>());
  rclcpp::shutdown();
  return 0;
}
Don't forget to build the package again before running the node.